As someone building a browser I need to parse a lot of URLs. Partially to validate them, but also to normalize them or get specific parts out of the URL. The URL API in browsers lets you do that, but it’s ergonomics aren’t ideal.
Notarizing your Electron application
Starting with MacOS 10.14.5, all signed applications by ‘new’ developers will need to be notarized or they will trigger Apple’s Gatekeeper software and prevent users from installing your app. That means that aside from signing your application, you will need to notarize it as well. This is how to successfully notarize your Electron application.
MacOS 10.14.5 came out a couple of days after I launched my (then unnotarized) application Polypane, leading to a number of complaints from users not able to install the app. Unfortunately there is not a lot of information out there. When I first encountered the issues, the error message couldn’t even be found on Google!
If you try to launch an unnotarized app that should be notarized on MacOS 10.14.5, you’re greeted with the following ominous sounding error message:
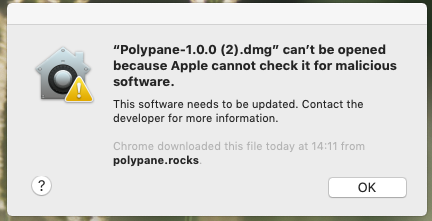
“Appname.dmg” can’t be opened because Apple cannot check it for malicious software.
This software needs to be updated. Contact the developer for more information.
Successfully notarizing an Electron application #
After spending the past week looking into how to deal with this error, learning a ton of things about notarization and updating a few npm packages along the way, here’s the guide to successfully notarizing an Electron application:
- Build your app with a hardened runtime
- Sign with a valid Developer Id
- Use electron-notarize to notarize your app
- Don’t sign your dmg
That’s right, notarizing your app takes 4 steps, of which just one is actually, well, notarizing the app. Apple decided to sneak in a couple more requirements alongside notarization that we’ll just have to deal with.
In this article I’ll be using electron-builder version 20.43.0 and I assume some familiarity with its configuration, but you should be able to take the same steps with other build tools.
1. Build your app with a hardened runtime #
One of the things Apple snuck in when adding the notarization is the requirement of a hardened runtime for your app, basically giving your application less rights by default. Not necessarily bad, but one more thing to take into account.
Running your app in a hardened runtime requires two things:
- Setting
"hardenedRuntime": truein the “mac” configuration for electron-builder, - Setting the right entitlements.
If you run a hardened runtime, it’s important to set at least two entitlements, “allow-unsigned-executable-memory” and “allow-jit”. There are many more entitlements you can specify here, but these are the only ones you need for an Electron application. The entitlements should be included in a plist entitlements file in your build folder. Here’s one for you to copy:
<?xml version="1.0" encoding="UTF-8"?>
<!DOCTYPE plist PUBLIC "-//Apple//DTD PLIST 1.0//EN" "http://www.apple.com/DTDs/PropertyList-1.0.dtd">
<plist version="1.0">
  <dict>
    <key>com.apple.security.cs.allow-unsigned-executable-memory</key>
    <true/>
    <key>com.apple.security.cs.allow-jit</key>
    <true/>
  </dict>
</plist>
If you use external libraries, you might also need to add com.apple.security.cs.disable-library-validation to that list, but be sure to test with your own application!
In your electron-builder configuration, set this file as both the entitlements and the entitlementsInherits values in your “mac” configuration. You need the entitlementsInherit to give Electron internals access to the same entitlements.
"mac": {
  "entitlements": "build/entitlements.mac.plist",
  "entitlementsInherit": "build/entitlements.mac.plist"
},
2. Sign with a valid Developer ID #
Apps can only be notarized when they have a valid Developer ID installed on your machine. Electron-builder will then automatically use a valid one in your keychain. You need an Apple Developer acccount for that, which you can get at developer.apple.com, and using xcode you can download your created Developer ID into your keychain (more info here: Create, export, and delete signing certificates)
However the signing tool that electron-builder uses, called electron-osx-sign, does a sanity check to verify the signing succeeded. Prior to MacOS 10.14.5, this sanity check would return positive, but with 10.14.5, it returns an error because while the signing went well, the app is not (yet!) notarized and that is an error. Yeah.
So for now, we need to disable this sanity check. You do that by setting "gatekeeperAssess": false in the “mac” configuration for electron-builder. All together, your mac configuration will have at least these settings:
"mac": {
  "hardenedRuntime" : true,
  "gatekeeperAssess": false,
  "entitlements": "build/entitlements.mac.plist",
  "entitlementsInherit": "build/entitlements.mac.plist"
},
3. Use electron-notarize to notarize your app #
Now for the actual notarization part. Electron developers (and anyone else that has an app, really) can use a tool called Electron-notarize, so install electron-notarize as a devDependency. This tools does everything: zips and uploads your apps to Apple’s servers, wait for the notarization to succeed, and then staples your app. Because this all happens asynchronously, it will add a significant amount of time to your build process.
The app should be notarized after it has been signed and before it’s packaged into a dmg. Electron-builder has a hook for this called afterSign. You can link that to a javascript file that will be called (and waited for) after sign. You add it to your top level “build” configuration:
"build": {
  "afterSign": "scripts/notarize.js"
}
The afterSign script itself looks like this:
require('dotenv').config();
const { notarize } = require('electron-notarize');

exports.default = async function notarizing(context) {
  const { electronPlatformName, appOutDir } = context;
  if (electronPlatformName !== 'darwin') {
    return;
  }

  const appName = context.packager.appInfo.productFilename;

  return await notarize({
    tool: 'notarytool',
    teamId: process.env.APPLETEAMID,
    appBundleId: 'com.yourcompany.yourAppId',
    appPath: `${appOutDir}/${appName}.app`,
    appleId: process.env.APPLEID,
    appleIdPassword: process.env.APPLEIDPASS,
  });
};
We only need to sign for MacOS, so if we’re not on darwin (the internal name for macOS), we return and don’t run the notarization code.
I am using dotenv to easily get environment variables from a “.env” file, so I don’t have to add real user credentials to my scripts. If you use git, make sure to add your “.env” to your .gitignore file. For even better security, consider using your MacOS keychain as outlined here: Safety when using appleIdPassword.
Speaking of user credentials. This is your Apple ID, but you need to generate a team id and an app-specific password to go along with it (so don’t use your regular password!) You can generate one at appleid.apple.com.
4. Don’t sign your DMG
Prior to version 20.43.0, electron-builder also signed your DMG installer. This wasn’t actually an issue, but with the new notarization rules, anything that is signed also needs to be notarized.
However, if you sign and notarize the DMG installer, it will actually trigger the error you saw at the top of this post. I personally think this is a bug in Apple’s logic (wouldn’t be the first) but while it’s there, it’s actually better to use an unsigned, unnotarized DMG. Apple’s Gatekeeper software seems to detect the notarized .app inside the DMG and will let users install your software without problems.
Starting in electron-builder 20.43.0, DMG’s are unsigned by default. You can be extra explicit with this behavior by adding "sign": false to your “dmg” build configuration:
"dmg": {
  "sign": false
},
Enjoy your notarized application! #
Once you’ve followed these steps and ended up with a .dmg, you can test it by either emailing it to yourself, or uploading-and-downloading it again to trigger Gatekeeper (These are official Apple procedures for testing). If everything went correctly, you should be able to open the .dmg without any warnings.
![]() Hi, I'm Kilian. I make Polypane, the
browser for responsive web development and design. If you're reading this site, that's probably
interesting to you. Try it out!
Hi, I'm Kilian. I make Polypane, the
browser for responsive web development and design. If you're reading this site, that's probably
interesting to you. Try it out!